Bathroom renovation - how to lay tiles, step by step
Bathroom renovation - how to lay tiles, step by step
Laying ceramic tiles is not as difficult as it may seem. All you need to do it yourself is some quick preparation and a handful of information! Here is a guide on how to lay tiles on a bathroom floor.

Step 1 - dry lay
In order to make the task as easy as possible, before starting work, you should carefully consider - and even make a drawing on a piece of paper - what effect you want to achieve. Do you want to arrange the tiles in equal rows, at right angles or in diamonds (diagonally)? Or maybe in an alternating or herringbone pattern? This decision depends only on your preferences and the tile collection you have chosen.
In the case of small tiles inspired by wood, you can try the herringbone pattern, a combination of white and black looks best in a chessboard pattern, while large stone-like tiles, e.g. STONE PARADISE, will acquire the most spectacular look if they are arranged in the traditional and - importantly - easiest way.
It is a good idea to dry lay the tiles on the floor before work begins. By doing this, you will see what the floor will actually look like, and it will make your task easier - it is enough to mark lines of successive rows with a pencil, for example. This will also allow you to avoid mistakes, such as the unsightly cutting of tiles by the door. Besides, it's a good time to choose the width of the joint.

Step 2 - cleaning
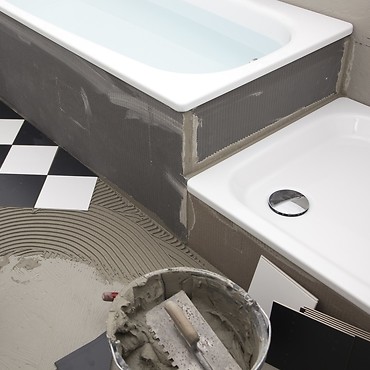
Time to prepare the surface. It is absolutely necessary to thoroughly clean the floor. Remove old tiles and even out the surface. Importantly, it does not have to be perfectly smooth, but it is necessary to minimise irregularities, sometimes by using a self-levelling screed or levelling mortar.
Greasy stains must be degreased and dust should be vacuum cleaned. When the surface is clean and dry, it should be primed. This will reduce the surface absorbability and increase the tile adhesion. It is also worth using insulation such as liquid foil. This impregnates and seals the surface.
Step 3 - mortar
There are many types of adhesive mortar available on the market. They have various properties appropriate for the specificity of individual materials. That is why it is really important to properly select the mortar to match the tiles. The easiest way is to ask the seller about the optimal product.
The mortar should be mixed to obtain a smooth mass in accordance with the manufacturer's recommendations, and applied to the surface using a toothed trowel. The width of the teeth depends on the size of the tiles. For small ones, choose a trowel with a tooth pitch of approx. 6mm, for the largest ones, 10-12 mm. Remember that the adhesive layer should be neither too thin or too thick (the optimum value is 5 to 10 mm). In addition, you should not cover an area larger than 1-1.5 m2 with mortar at once. And if the tiles are very small - this area should be even smaller.
Step 4 - lay the tiles
It is time for the main step! Depending on how you want to arrange the tiles, you should start with a side wall, or… the centre. This is sometimes the only way to achieve the desired effect. For example, when you want the joints in the bathroom and the corridor to run in one line, or if you want to avoid unsightly cuts at the door. Everything should be clear after the dry lay.
Laying the first tile is the hardest. After placing it on the mortar, it should be pressed gently. The safest way to do it is with a rubber mallet. The next tiles are placed in rows and secured with spacers. After every tile, use a spirit level to check if they are straight.
Tile cutting is the most troublesome. It is impossible to avoid it, but it is worth noting that there will be more of it when you choose a diamond pattern. Use special tools to cut the tiles. A guillotine cutter is quite efficient. It is used to make a slight incision on the decorative side and then snap the tile by hitting its edge. It may also be necessary to use a drilling machine with a hole saw or special pliers to make circular openings. With one of these, it is possible to adjust the shape of the cut tile, for example, for a pipe.
Step 5 - grouting
The last stage of work on the bathroom floor is grouting. How do you do it properly? Read HERE
See more tips in this category
-
FRESH SYSTEM - a guarantee of freshness
The WC concealed systems with the FRESH SYSTEM feature a dedicated container for toilet fresheners. The ... -
QUICK FIX - universal mounting brackets
The new AQUA WC concealed systems are equipped with very handy QUICK FIX wall brackets for easy ... -
Bathtub installation — the most common mistakes and how to ...
The bathtub is usually the central point of the bathroom. The place that is associated not only with ...